User On-Boarding Basics with MapR
MapR FS provides some very useful capabilities for data management and access control. These features can and should be applied to user home directories.
A user in a MapR cluster has a lot of capability at their fingertips. They can create files, two styles of NoSQL tables, and pub/sub messaging streams with many thousands of topics. They can also run MapReduce or Spark jobs, or run just about any program against the file system using the POSIX capability of the cluster. With all the stuff they can do, there’s bound to be a lot of data getting stored, and it’s a good idea to keep tabs on that so it doesn’t get out of control.
Let’s look at how we can apply MapR’s data management features to user home directories hosted in a MapR cluster.
Following Along
If you want to follow along, all you need is a MapR cluster or single-node sandbox running MapR 5.1.0 or later.
All of what I’ll demonstrate here can be done on any license level of MapR, from Community Edition to Enterprise.
What We’ll Do
We’ll use MapR FS volumes for our user home directories. Volumes are a unit of data management, and for user home directories, can do the following for you:
- Restrict access through Volume Access Control Expressions (ACEs)
- Control space usage through quotas
- Data Protection through snapshots, for accidental deletion (Enterprise)
- Remote mirroring (Enterprise)
Let’s Do It
Jumping right in, we’ll run a few maprcli commands. I’ll explain these in a minute.
maprcli volume create \
  -path /user/vince \
  -name home.vince \
  -quota 300M \
  -advisoryquota 200M \
  -ae vince \
  -readAce u:vince \
  -writeAce u:vince

hadoop fs -chown vince:vince /user/vince

# The "type" argument 0 means "user"
maprcli entity modify \
  -name vince \
  -type 0 \
  -email vgonzalez@maprtech.com \
  -quota 2T \
  -advisoryquota 1T
A few things happened here.
Next I create a volume for user vince. The volume has a quota of 300MB, which means
the volume will stop accepting writes once it has 300MB of data. This is a hard quota.
The volume also has an advisory quota of 200MB.
Then we set the owner of the volume’s root to the user for whom we created the volume.
Last, we set a quota for the “accountable entity” named vince. The accountable entity quota gives us a way to constrain the space used by a user across volumes, and also a way to account for the number of volumes and the total space consumed across them. The accountable entity can only be modified after a volume is created.
Consider a scenario in which a user has multiple volumes, such as a basic home directory and a workspace for an application the he’s developing. The accountable entity gives the cluster admins a convenient way to sum up all the usage of the volumes provisioned to that entity.
By convention, we mount the volume at the path /user/<username> and name it
home.<username>. This makes it easy to filter when dealing with large number of
volumes.
The readAce and writeAce options create access control expressions (ACEs) on the volume.
Volume ACEs are very useful as a way to limit access to data in the volume. Regardless of what permissions a user sets on files within the volume, users who do not match the ACE are denied access. Since only a user with administrative privileges can modify volumes, this is a good way to prevent inadvertent data sharing.
We used the -ae option to set the “accountable entity” so that this volume is counted toward
user vince`s entity quota.
Finally, we set the owner of the mount point of the newly created volume. This illustrates a subtle point. Volume ACEs don’t have anything to do with the POSIX permissions of the data in the volume; they only govern access to the volume and the data contained in it. So we need to make sure that ownership information is set correctly on the top level directory so that the users can actually use the volume.
More About Quotas
We set quotas on the volume, and these will trigger an alarm if exceeded. For instance, if I write more data than is allowed by my hard quota, I’ll see an alarm like the following:
$ maprcli alarm list -entity home.vince -json
{
	"timestamp":1465937565435,
	"timeofday":"2016-06-14 01:52:45.435 GMT-0700",
	"status":"OK",
	"total":2,
	"data":[
		{
			"entity":"home.vince",
			"alarm name":"VOLUME_ALARM_QUOTA_EXCEEDED",
			"alarm state":1,
			"alarm statechange time":1465937455432,
			"description":"Volume usage exceeded quota. Used: 371 MB Quota : 300 MB"
		},
		{
			"entity":"home.vince",
			"alarm name":"VOLUME_ALARM_ADVISORY_QUOTA_EXCEEDED",
			"alarm state":1,
			"alarm statechange time":1465937449424,
			"description":"Volume usage exceeded advisory quota. Used: 202 MB Advisory Quota : 200 MB"
		}
	]
}
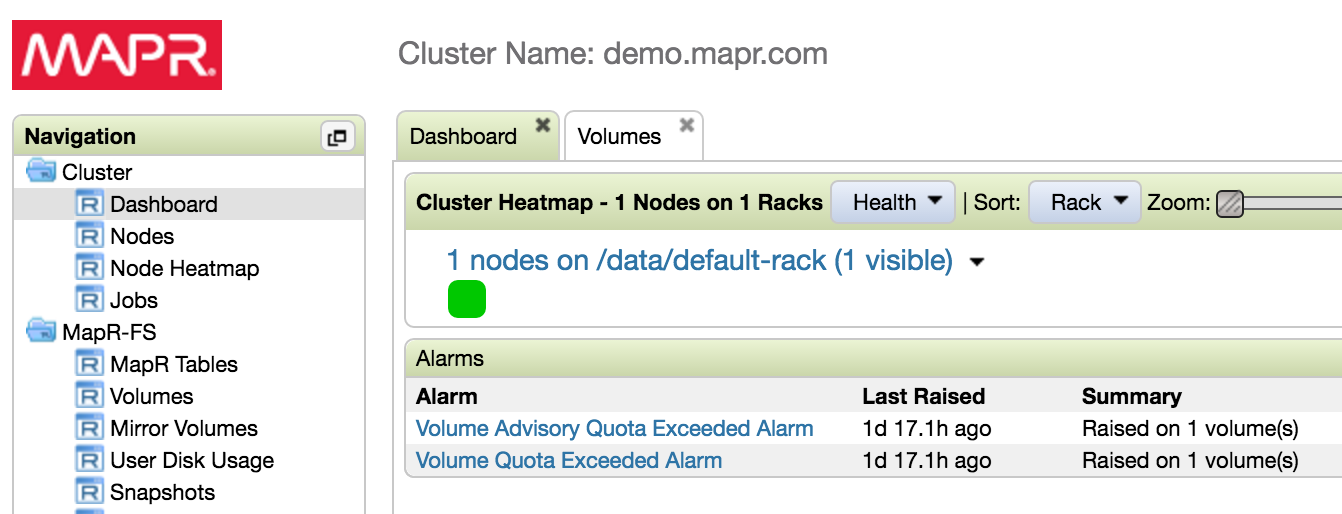
These alarms will also be surfaced in the MCS, both in the main alarms panel of the dashboard page:
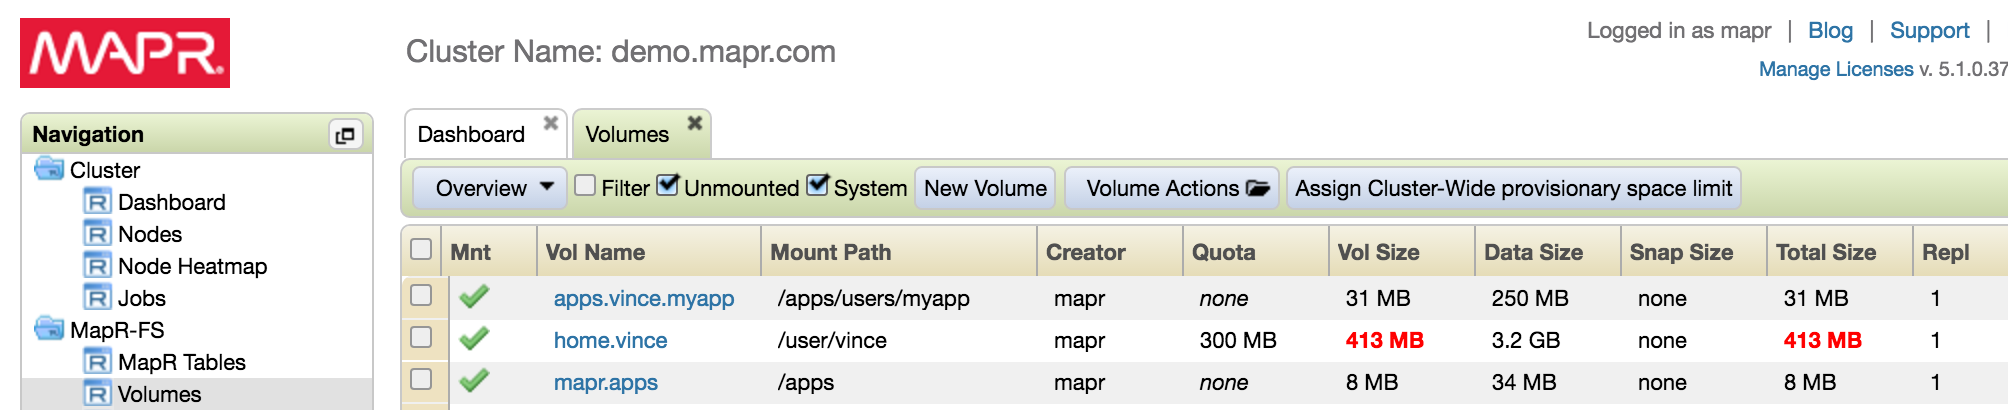
And also in the volume list, where the actual usage will be highlighted in bold red text:
Getting Usage for your Entity (user)
Having applied quotas to the user home volume and to the accountable entity, we can get the usage information.
First, let’s get the entity info for vince:
maprcli entity info -name vince -json
{
	"timestamp":1465938582023,
	"timeofday":"2016-06-14 02:09:42.023 GMT-0700",
	"status":"OK",
	"total":1,
	"data":[
		{
			"EntityType":0,
			"EntityName":"vince",
			"VolumeCount":2,
			"EntityQuota":2097152,
			"EntityAdvisoryquota":1048576,
			"DiskUsage":444,
			"EntityEmail":"vgonzalez@maprtech.com",
			"EntityId":2005
		}
	]
}
We can see here that user vince has two volumes ("VolumeCount":2) and these
volumes are consuming 444MB of storage. In the example above, we can see that
this exceeds the volume quota, but does not exceed the entity quota, which is
much higher. This gives you a lot of flexibility to manage space usage.
Wait, what?
Did you notice that the disk usage exceeded the quota by a large amount? How did that happen if I had a hard quota of 300MB set?
It’s because for the purposes of the example, I wrote some data, then set the quota to a value much lower to trigger the alarm, so I could take the screenshot. This illustrates that the quotas we apply to a volume can be adjusted over time to allow more space usage, or less.
Nice catch, by the way!
A Note on Volume ACEs
Since volumes can be created fairly liberally (MapR FS supports many thousands of them in a single cluster), it’s a great idea to use volumes liberally to organize and account for your data.
If you’re organizing your data into volumes you can use ACEs to govern access to the data in the volumes. So if we’re organizing things well, we can probably use volume ACEs as the primary access control mechanism for a dataset, which will allow us to use file and directory level ACEs only when absolutely necessary.
While file and directory ACEs are a great tool, you should consider using volume ACEs first, then only applying directory and file ACEs as needed.
Setting Default Quotas
You can also set default quotas. On the command line, you can issue the following command to set a 1TB user quota and a 10TB group quota:
maprcli config save -values '{"mapr.quota.user.default":"1T","mapr.quota.group.default":"10T"}'
Now, when you create a volume for a user and specify an accountable entity, they’ll automatically be subject to the default entity quota, unless you change it.
As an example, if we create user fred’s home, and immediately show the entity
information, we see that Fred’s got an entity quota of 1048576MB, or 1TB.
maprcli volume create -path /user/fred -name home.fred -ae fred

maprcli entity info -name fred
EntityType  EntityId  EntityName  EntityAdvisoryquota  DiskUsage  VolumeCount  EntityQuota
0           2007      fred        0                    0          1            1048576
Conclusion
So a few points in summary.
-
You should be using volumes to organize your data. Creating them for each user, unless you have many tens of thousands of users, is fully within your cluster’s capability.
-
Apply quotas (advisory and/or hard) to your entities, like users. This will fire alarms when the quotas are exceeded, helping you avoid capacity problems due to runaway jobs or “overenthusiastic” users.
-
Apply ACEs judiciously, starting from the volume level. If data is being organized by volume, you can control access to data through volume-level ACEs. You can then apply file/directory level ACEs sparingly as required.
-
Finally, it’s a good idea to automate this sort of thing. Since it’s only a few steps, a simple script should suffice.
I hope this helps you manage space in your cluster more effectively!